With iOS apps becoming the need of the hour for Apple product consumers, a large group of iOS App development companies are delving into improving the performance quotient of applications. Well, just like any other mobile app, even an iOS app requires a set of utilities for running flawlessly. One such vital component that’s required by every iOS app is a backend to store the data that’s to be shared with other users and even synced between a user’s devices.
Explore: 8 Organization & Time Management Apps for Students
Building the backend for an iOS app can be quite tiresome, expecting you to invest a great deal of time and efforts. Thanks to Parse, we’re now able to create a backend for an iOS application. In this blog, I’ll be discussing more about using Parse for adding Cloud Backend for an iOS app.
What exactly is Parse?

Parse is one of the most popular Backend as a Service platforms. It offers three products in a single package including: Parse Core, Parse Push and Parse Analytics. Here’s a closer look at the functioning of each product:
- Parse Core– It handles the data saving and social media integration part of the iOS application. In addition to this, the Parse Core also enables you to write your own code that would further be run in the cloud, rendering custom server-side logic.
- Parse Push– This product is used for sending push notifications. With Parse Push, the developer can easily customize, schedule and send push notifications to all the registered users/specific user group for the application.
- Parse Analytics– This tool allows you to keep a track of your app’s data. You can easily receive statistics regarding usage of data including active users, installations, push notification open rates, user retention etc.
Creating a Cloud Back-end for an iOS Application
Step 1 — Download the project file. It includes a starter project as well as the completed final project. The project includes a login, signup, an add/edit note view and a notes table view. In addition to this, there’s also an application that allows the user to save and retrieve notes to the cloud architecture.
Step 2 — Once you run the app, an empty table view will be displayed on the screen. This app will require the user to be logged in for being redirected to the table view that displays a list of saved notes.
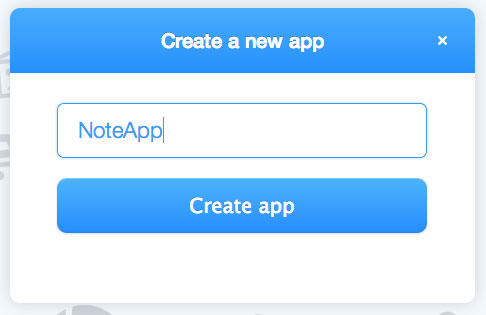
Step 3 — Here, you need to create an account on parse.com. On logging in using your login credentials, access the dashboard for creating a new app and also viewing the list of all apps. Name the app as NoteApp. Here’s a screen-shot for how the app will be created:

Once you’re done with creating the app, your app IDs along with keys will be displayed on the screen. These will later be used in the iOS Application.
Step 4 — Download the Parse SDK and unzip the file, followed by dragging the framework into the project’s Frameworks group folder.
Step 5 — Add some libraries to the project. For this, just select the project on the project navigator and click on the ‘Build Phases’ tab. After this, expand ‘Link Binary With Libraries’. Once the list is displayed, click on ‘Add’ icon for these libraries:
- AudioToolbox.framework
- CFNetwork.framework
- CoreGraphics.framework
- CoreLocation.framework
- libz.dylib
- MobileCoreServices.framework
- QuartzCore.framework
- Security.framework
- StoreKit.framework
- SystemConfiguration.framework
Step 6 — Open the AppDelegate.m file and add the below mentioned improt to the top of the file. Also, make the required modification to the application named: didFinishLaunchingWithOptions: method by entering your app id and client key.
#import

- (BOOL)application:(UIApplication *)application didFinishLaunchingWithOptions:(NSDictionary *)launchOptions
{
    [Parse setApplicationId:@"YOUR APP ID"
                  clientKey:@"YOUR CLIENT KEY"];
    return YES;
}
Step 7 — Run the created app and navigate to the Parse dashboard. Now, select the app and click on the Data Browser tab. Here, you’ll see a table data of the object created earlier.
Step 8 — Create the below mentioned outler and action connections. In JKESignupViewController.h, make the following changes:
@interface JKESignupViewController : UIViewController

    @property (weak, nonatomic) IBOutlet UITextField *usernameTextField;
    @property (weak, nonatomic) IBOutlet UITextField *emailTextField;
    @property (weak, nonatomic) IBOutlet UITextField *passwordTextField;

    - (IBAction)signup:(id)sender;

@end
Step 9 — Add the below mentioned method in the JKENotesListViewController.m file for customizing the query sent to Parse in order to allow the retrieval of posts of only the logged in users.
// Override to customize what kind of query to perform on the class. The default is to query for
// all objects ordered by createdAt descending.
- (PFQuery *)queryForTable {

    // Create a query
    PFQuery *query = [PFQuery queryWithClassName:self.parseClassName];

    // Follow relationship
    if ([PFUser currentUser]) {
        [query whereKey:@"author" equalTo:[PFUser currentUser]];
    }
    else {
        // I added this so that when there is no currentUser, the query will not return any data
        // Without this, when a user signs up and is logged in automatically, they briefly see a table with data
        // before loadObjects is called and the table is refreshed.
        // There are other ways to get an empty query, of course. With the below, I know that there
        // is no such column with the value in the database.
        [query whereKey:@"nonexistent" equalTo:@"doesn't exist"];
    }

    return query;
}
Step 10 — Now, run and test the app, Any new note saved here will be linked to you and you’ll be able to see all your notes. The app will be able to save and edit notes but not delete them. Still, if you’re inclined on deleting any object, simply use the below mentioned method:
[myObject deleteInBackground];
Conclusion
So those were the steps that mark the use of very popular ready-made backend service i.e. Parse for iOS Apps. With Parse, you can easily reduce the time taken by your app in making it to the market. Go ahead and proceed to using Parse for meeting the backend needs of your iOS application.
[author type=”custom” name=”Lucie Kruger” avatar=”http://i.imgur.com/u0Gcofe.jpg” target=”_blank” rel=”nofollow”]Lucie Kruger is an eminent Senior Content Editor and IT consultant for Mobiers Ltd, a custom Mobile App Development company. You can also contact her, if you are looking forward to Hire Android Application Developer.[/author]
