Can you imagine hosting a full WordPress website at a minimum cost? Well, there are plenty of hosting service providers who attract customers with such alluring offers. But, imagine the same benefits for hosting on the leading cloud service platform like AWS (Amazon Web Services)?
Is AWS new for you and you possess no idea where to begin from in order to launch your site? Then, you did not worry as Amazon has got an amazing virtual private server installation for the smallest of businesses to think less about anything other than their application. Installing and running a WordPress is easier on Amazon EC2 but a few bloggers were skeptical for the same.
The small bloggers look for flexible cost pricing as the EC2 is based upon the usage. Henceforth, most of the small blog admins were not excited to pay such a huge kind of pricing and not many had the technical skills for managing the EC2 installation.
In this article, we will be taking a look at how Amazon came over to these issues with the AWS Lightsail. Let’s get started with the basics.
What is Amazon Lightsail?
Amazon Lightsail is one of the easiest ways to get started with Amazon Web Services (AWS) if you are in need of virtual private servers. Lightsail has got everything that you need to launch your project on a rapid scale. It comprises a virtual machine, SSD-based storage management, quick data transfer, DNS management and a static IP which is utilized for a low and predictable price. It is seen that plenty of the small website and the blogs run on the shared hosting and anyone who is using shared hosting knows the real trouble that is associated with it.
The site admin does not have any control of these hostings and sometimes your site is working fine but other times it is slow as a turtle. This happens as the resources of the shared hosting plans are distributed among other users. Contrary to this, AWS Lightsail offers a virtual private server for all the small website owners with shared server pricing.
Quick Guide on Installing WordPress in Lightsail
AWS Lightsail WordPress installation is all automated and can be done within a few minutes. AWS makes use of the Bitnami WordPress image for installing WordPress and manage the same on it. Once, you are required to create a server instance by clicking on Create Instance and then select all the applications which you need to install on that instance. There are a few things to understand before installing WordPress. AWS comprises of a lot of regions for having various data transfer limits. AWS Lightsail gives you the closest region that is based upon your location but you can also customize it as per your target audience for your website. It is witnessed that in present times, the US-based region has got the maximum data transfer allocations.
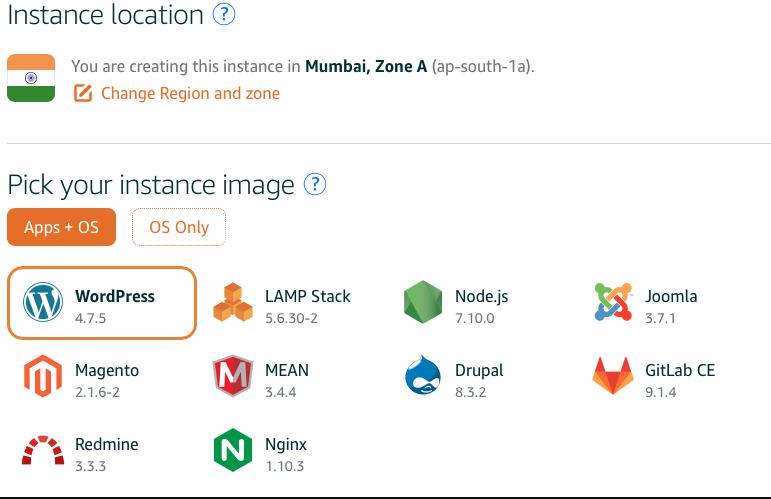
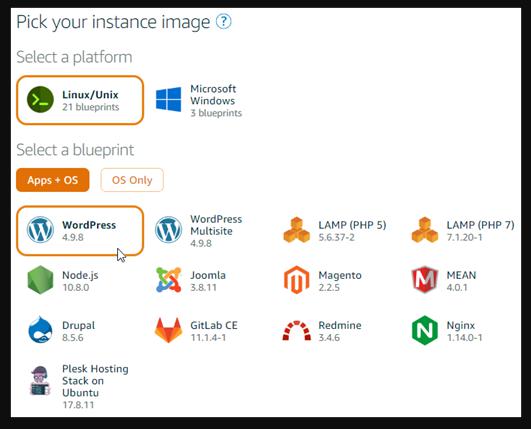
Once you are choosing any particular region, you need to pick an instance image. You can choose the image for OS only or Apps and OS both. This installs the software on your computer where you can Select Apps + OS and then wish to select WordPress from the application list.
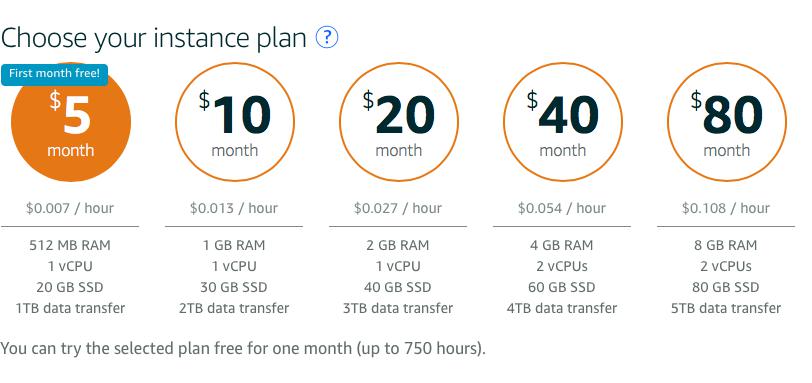
There are similar applications that are supported by the LightSail instance but we are only going to talk about WordPress in this guide. Once the user is selecting the app then they need to pick a plan which is suitable for the instance. A very basic plan for $5 is the most convenient plan for the people who wish to run a blog. On the other hand, you can also choose the plans based on your requirements but it is important to note that all of these plans are SSD based storage where the response time is usually fine.
On a general basis, it is recommended to select the plan according to the expected traffic on your website. Also, you do not need to worry much before selecting the plans because the upgrade process is very easy and simple to transit from one plan to another one.
Once the instance is ready it will push out a public IP address and if you click on that public IP Address, you will see a sample WordPress website running on your screen. You are required to enter the user-id and password for the WordPress admin login and the default user id is ‘user’ for every user. After this, you will see a button that connects using SSH on the LightSail panel. You are required to enter the below-given command for getting the password for the admin account.
| cat bitnami_application_password |
This will allow the password to be displayed on the copied code which is used to log in to the WordPress admin dashboard.
![]()
There exists a Bitnami logo that will be displayed in the bottom-right corner and you can enter the below-given command for removing that logo from the website.
| sudo /opt/bitnami/apps/wordpress/bnconfig –disable_banner 1 |
Also, you can browse the website by checking the logo and if the need persists then you can restart the entire web server. For doing so, you can write the below-given command for restarting the webserver.
| sudo /opt/bitnami/ctlscript.sh restart |
With this, your WordPress account is set up and you can run it on a public IP where it can be accessed using that IP address.
There are additional benefits on AWS LightSail that are not available on the Shared hosting be it Static IP Address, DNS Management, and Backup. Instead of beginning with a shared server and heading forward to VPS, it is advised to all get started with a dedicated virtual private server. With the Lightsail, you will get an AWS infrastructure that offers unparalleled performance. Here’s how you can create an instance and run up on AWS Lightsail.
Step 1: Sign up for AWS
Before beginning to work with the AWS Lightsail, it is a prerequisite to sign up for an AWS account. But if you already possess an AWS account then simply log into the account for getting headed by following the further steps.
Step 2: Creating a WordPress Instance in Lightsail
You need to complete the entire steps by getting your WordPress instance up and running on Lightsail. If you wish to get more information on creating an instance in Lightsail then visit the official documentation that is designed for the same.
1. Sign in to the Lightsail console
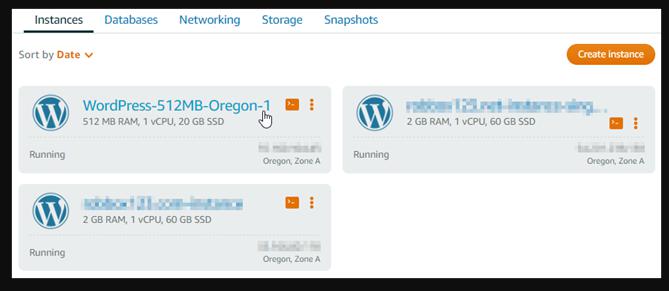
2. Click on the Instances tab from the Lightsail homepage and select Create instance.
3. Select the AWS Region and Availability Zone for your instance.

4. Select your instance image
- Click on Linux/Unix as the platform.
- Select WordPress as the blueprint.
5. Select an instance plan
Note: There are various plans ranging from low to high budgets with predictable cost and machine configuration (RAM, SSD,vCPU) and data transfer allowance. Also, the AWS credits are free for one month to your account.
6. Enroll a name for your instance
Note: The instance name should follow the given rules.
- It must be unique within each AWS Region in your Lightsail account.
- The name should contain at least 2 to 255 characters.
- It should start and end with an alphanumeric character or number.
- Name can include alphanumeric characters, numbers, periods, underscores and dashes.

7. Select the option of Create instance.
Step 3: Connecting instance using SSh and setting the strong password for your WordPress website
The default password for signing into the administration dashboard of your WordPress website is stored deep on the instance. The user is required to complete all the essential steps for connecting your instance before making use of the browser-based SSH clients in the Lightsail console and get the password for the administration dashboard.
Note: For more information, you can check out the official documentation from the Amazon to get the user name and password for your application in Amazon Lightsail.
- By clicking on the Instances tab from the home page of Lightsail, select the SSH quick-connect icon for your WordPress instance.
- After the browser-based SSH client window opens, you are required to enter the given command for retrieving the default application password:
| $HOME/bitnami_application_password |
- Make a note of the password that is displayed on the screen so that you can later use it to sign in to the administration dashboard for your WordPress website.

Step 4: Log in to the Admin dashboard of your WordPress website
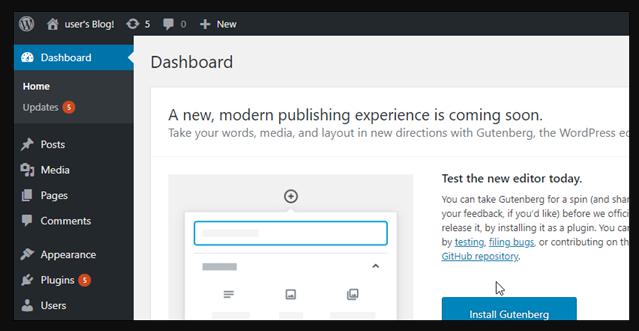
After having the password for the administration dashboard of your WordPress website, you can sign in. You are allowed to change the user password, change your website theme, install plugins and much more from the admin dashboard.
- Open the browser window and enter the given details.
| http://PublicIpAddress/wp-login.php |
In the address, replace PublicIpAddress with the public IP address for your WordPress instance. You can get your instance’s public IP address from the Lightsail console as given in the example:

- Enter the user from the Username or Email Address box.
- Enter the default password that you obtained earlier in the tutorial from the Password box.
- Select Log in.

You are now signed into the admin dashboard of your WordPress website where you can perform administrative actions. For more detailed information regarding the administration of your WordPress website, you can check the WordPress Codex in WordPress documentation.
Step 5: Create a Lightsail static IP address by attaching it to your WordPress instance
The default public IP for your WordPress instanced get changed if you on and off your instance. A static IP address is attached to an instance where it sticks to the same name even if you stop and start your instance.
For more information, you can visit the official site launched by Amazon for creating a static IP and attaching it to an instance in Amazon Lightsail.
- Select the running WordPress instance from the Instances tab of the Lightsail homepage.
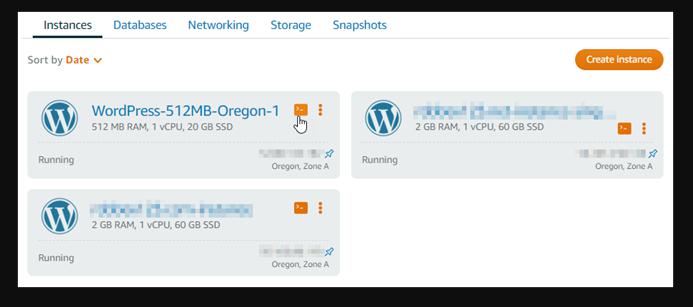
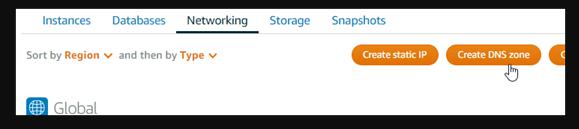
- 2. Select the Networking tab and then choose on Create static IP.

- The static IP location along with the attached instance are pre-selected that is based on the instance which can be chosen earlier in this tutorial.

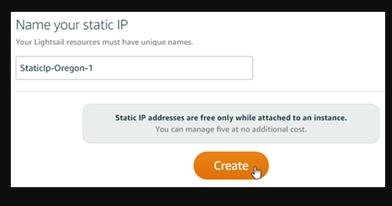
- Name your static IP and then click on Create.
Step 6: Create a Lightsail DNS zone by mapping a domain to your WordPress instance
Transfer the management of your domain’s DNS records to Lightsail by easily mapping a domain to your WordPress instance and managing more of your website’s resources using the Lightsail console. For completing the following steps, create the Lightsail DNS zone and map a domain for your WordPress instance.
- Select on Create DNS zone from the Networking tab of the Lightsail home page.
- Enter your domain and then choose to Create a DNS zone.

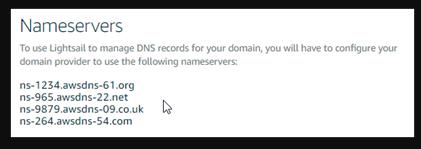
- Make a note of the name server addresses that are listed on the page. You can add name server addresses to the registrar of your domain name for transferring management of your domain’s DNS records to the Lightsail.
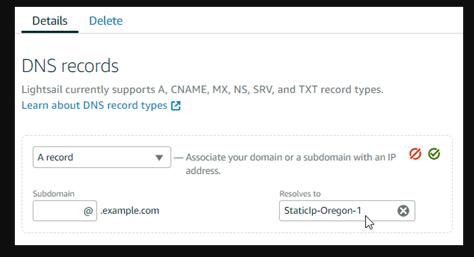
- After managing the records of your Domain’s DNS that are transferred to Lightsail and then add an A record to point the apex of your domain to the WordPress instance as shown:
- Select Add record in the DNS zone of your domain.
- Enter an @ symbol to point out the apex of your domain in the Subdomain box to your instance. The @ symbol explicitly depicts that you are displaying an apex record which is not added as a subdomain.
- Select the static IP which you have attached to the WordPress instance in the Maps to box.
- Click on the save icon.
Wrapping Up
Here, we come to the end of the article. We hope you have understood how to run your WordPress website in the Lightsail of the Amazon Web Services. You can follow the given procedure for setting up your WordPress website in the Lightsail with the Amazon Web Services Till then – keep learning!
Fastidious response in return of this query with real arguments and explaining everything about that.